I know this is my hair blog, but I ran into a follower and one of my girls was wearing one of these skirts with a cute white sweater and a coordinating headband. She asked if I would share. Here you go!
Threeish years ago, we had to have outfits for a Pioneer parade and I had NOTHING for my girls to wear, so the night before I grabbed some calico I had sitting around and made your basic, gathered floor length skirt for each one of my girls and a basic white apron. It worked for the time and through some tweaking, it has evolved into a fun skirt my girls love to wear. We go to the fabric store and I hear "I would love THIS for a skirt, Mom!!!" Since I am a sucker for fun things for my kids to wear, I happily oblige.
And as a disclosure, I don't like sewing with patterns and I have no idea what I am doing at all. I just get an idea in my head and I start cutting and sewing. I couldn't tell you what a bias is to save my life. Don't judge, mmmkthx.

First I head to my favorite fabric store...side note, I just found the BEST fabric store by where we are currently living. They sell Moda AND Amy Butler! If they carried Heather Bailey, my life would be complete! Okay, back to the tut. I buy a yard of my base fabric, and then 12 inches of a coordinating fabric. Then I measure it on my girl. Usually it ends up being half a yard that I use. For the smaller kids I shorten that. Hence the problem of not using a pattern. Also make sure that you add on about 3 inches for the casing.

I then cut two lengths of fabric for the main body of the skirt from selvage to selvage.

And I repeat with the coordinating fabric. I cut it six inches.

Fold the coordinating pieces of fabric in half and press.

The place the raw side of the coordinating fabric to the right side of the body material.

Sew.
I use a straight stitch. If you had a serger... which I do but it is currently somewhere in two vast storage units whereabouts unknown...You would serge this part together and then straight stitch next to the serged edge. Instead, I have trimmed it with pinking sheers.

Unfold the two pieces and repeat with the other two pieces.

(I didn't actually trim this one with the sheers because it was late on Saturday and when you are thinking "Dang, my girls have nothing to wear to church tomorrow" and it's midnight, well, sometimes you forget things.)

Then press the fabrics flat.

Now, I take and put the two pieces together. The front and back if you will. Right sides together. Then I sew in just over an inch from the selvage. Start from the bottom to make sure your coordinating fabric joints match up.

Like so.

Then trim...or serge.

Now I measure around my daughters waist. I pull the elastic snug and then overlap by half an inch.

Then I make the casing. On the top of the skirt, I fold down the raw edge, depending on how close my fabric is on either side determines the first fold of the casing. That is why I go three inches, because I am not an accurate seamstress and I need to leave room for error. I make one fold and press it down, then I fold that first fold over and measure how much room I have for my elastic and press the second fold down. You can see the press marks in the above picture.


I have plenty of room for the elastic.

Next, I sew a straight stitch around the top of the casing. This step isn't necessary, however I have learned that it keeps the elastic from twisting and makes for a prettier top.

Then I sew the bottom half of the casing, leaving a two to three inch opening.

Like so.

Then take two safety pins and attach one end of the elastic to the fabric and attach the other safety pin to the other end of the elastic.

Then thread the elastic through the casing.

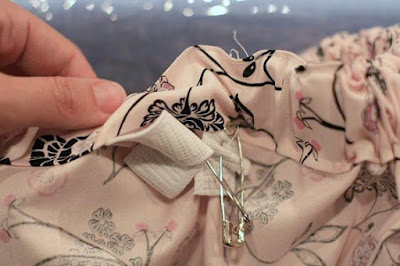
I pull my lead out and attach it to the other safety pin while I even out the fabric as much as I can before sewing it up.

I overlap my elastic by an inch and a half and sew a square around the edges and an X from corner to corner.

Then I pull the skirt and stuff that elastic up into the casing.

Pull the casing flat and sew. Remember to back stitch.

Spread the fabric evenly and VOILA! You have a super easy, fun skirt.
It only takes me 20-30 minutes to make one of these puppies and we have tons of them now. Hopefully these instructions make sense. Let me know if you have any questions!
With a couple of tweaks, you can do so many things with this skirt. I have done an overlay and and under skirt. I have made a plain edge without the coordinating fabric and just hemmed it. I have wanted to sew strips together and make a striped skirt with the coordinating fabric on the bottom, but I haven't gotten around to that yet. My friend thinks it would be darling to put belt loops on the casing and thread a ribbon through. I agree with her.
Next tutorial, the super easy headband.